Tuesday, 1 December 2020

Surya Namaskar

                       Surya Namaskar


Surya Namaskar or Sun Salutation is a sequence of 12 powerful yoga poses. Besides being a great cardiovascular workout, Surya Namaskar is also known to have an immensely positive impact on the body and mind.


Surya Namaskar is best done early morning on an empty stomach. Each round of Sun Salutation consists of two sets, and each set is composed of 12 yoga poses. You might find several versions on how to practice Sun Salutation. However, it is advisable to stick to one particular version and practice it regularly for best results.

Besides good health, Surya Namaskar also provides an opportunity to express gratitude to the sun for sustaining life on this planet

benefits of Surya Namaskar (Sun Salutation):

  • Helps maintain cardiovascular health
  • Stimulates the nervous system
  • Helps in stretching, flexing and toning the muscles
  • An excellent exercise for weight loss management
  • Strengthens the immune system
  • Enhances cognitive functions
  • Improves overall health, strengthens the body and relaxes the mind

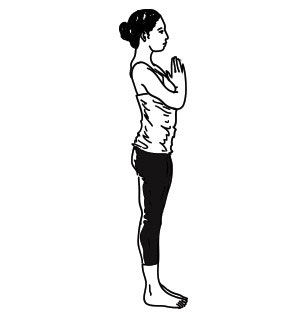
Step 1. Pranamasana (Prayer pose)
surya namaskar yoga step 1

Stand at the edge of your mat, keep your feet together and balance your weight equally on both the feet. Expand your chest and relax your shoulders. As you breathe in, lift both arms up from the sides, and as you exhale, bring your palms together in front of the chest in prayer position.

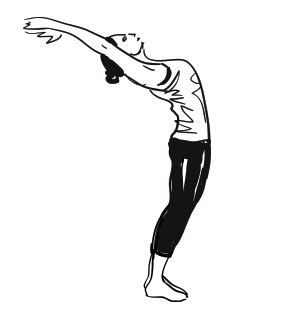
Step 2. Hastauttanasana (Raised arms pose)
surya namaskar steps

Breathing in, lift the arms up and back, keeping the biceps close to the ears. In this pose, the effort is to stretch the whole body up from the heels to the tips of the fingers.

Tip to deepen this yoga stretch:
You may push the pelvis forward a little bit. Ensure you're reaching up with the fingers rather than trying to bend backward.

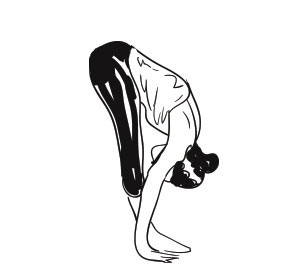
Step 3. Hastapadasana (Standing forward bend)
how to do surya namaskar

Breathing out, bend forward from the waist keeping the spine erect. As you exhale completely, bring the hands down to the floor beside the feet.

Tip to deepen this yoga stretch:
You may bend the knees, if necessary, to bring the palms down to the floor. Now make a gentle effort to straighten the knees. It's a good idea to keep the hands fixed in this position and not move them henceforth until we finish the sequence.

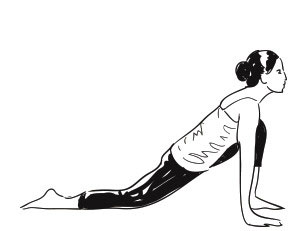
Step 4. Ashwa Sanchalanasana (Equestrian pose)
sun salutation steps

Breathing in, push your right leg back, as far back as possible. Bring the right knee to the floor and look up.

Tip: How to deepen this yoga stretch?
Ensure that the left foot is exactly in between the palms.

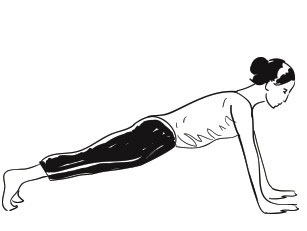
Step 5. Dandasana (Stick pose)
12 poses of surya namaskar

As you breathe in, take the left leg back and bring the whole body in a straight line.

Tip to deepen this yoga stretch:
Keep your arms perpendicular to the floor.

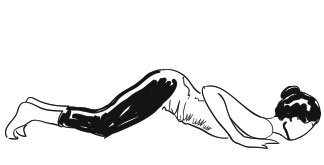
Step 6. Ashtanga Namaskara (Salute with eight parts or points)
surya namaskar poses

Gently bring your knees down to the floor and exhale. Take the hips back slightly, slide forward, rest your chest and chin on the floor. Raise your posterior a little bit. The two hands, two feet, two knees, chest and chin (eight parts of the body) should touch the floor.

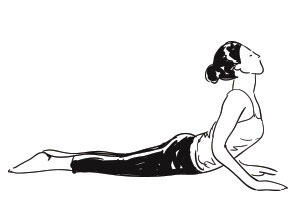
Step 7. Bhujangasana (Cobra pose)
how to do sun salutation

Slide forward and raise the chest up into the Cobra pose. You may keep your elbows bent in this pose with the shoulders away from the ears. Look up at the ceiling.

Tip to deepen this yoga stretch:
As you inhale, make a gentle effort to push the chest forward; as you exhale, make a gentle effort to push the navel down. Tuck the toes under. Ensure you're stretching just as much as you can and not forcing your body.

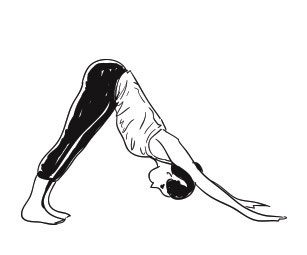
Step 8. Adho Mukha Svanasana (Downward facing dog pose)
sun salutation yoga pose

Breathing out, lift the hips and the tailbone up to bring the body into an inverted ‘V’ pose.

Tip to deepen this yoga stretch:
If possible, try and keep the heels on the ground and make a gentle effort to lift the tailbone up, going deeper into the stretch.

Step 9. Ashwa Sanchalanasana (Equestrian pose)
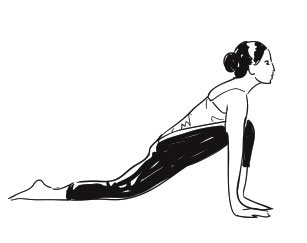
sun salutation steps

Breathing in, bring the right foot forward in between the two hands. The left knee goes down on the floor. Press the hips down and lookup.

Tip to deepen this yoga stretch:
Place the right foot exactly between the two hands and the right calf perpendicular to the floor. In this position, make a gentle effort to push the hips down towards the floor, to deepen the stretch.

Step 10. Hastapadasana (Standing forward bend)
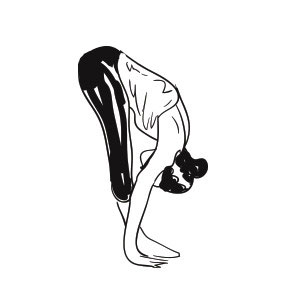
Sun Salutation yoga

Breathing out, bring the left foot forward. Keep the palms on the floor. You may bend the knees, if necessary.

Tip to deepen this yoga stretch:
Gently straighten the knees, and if you can, try and touch your nose to the knees. Keep breathing.

Step 11. Hastauttanasana (Raised arms pose)
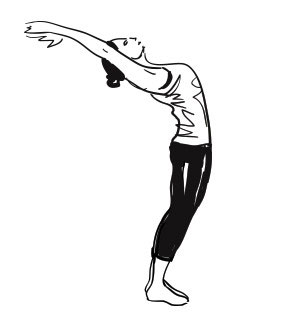
Sun Salutation or Surya Namaskar Yoga

Breathing in, roll the spine up. Raise the hands up and bend backward a little bit, pushing the hips slightly outward.

Tip to deepen this yoga stretch:
Ensure that your biceps are beside your ears. The idea is to stretch up more rather than stretching backward.

Step 12. Tadasana (Mountain Pose)
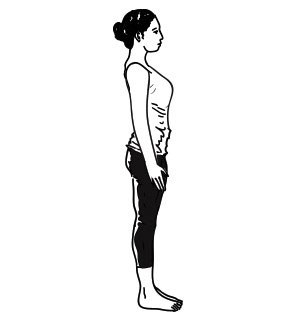
how to do Sun salutation sequence

As you exhale, first straighten the body, then bring the arms down. Relax in this position and observe the sensations in your body.

This completes one set of Surya Namaskar. Complete the round by repeating the steps. Only this time, start with taking the left foot behind in step number 4 and bringing the right foot forward in step number 10. Once done, you would’ve completed one round of Surya Namaskar


Wednesday, 25 November 2020

Side Plank Pose


Side Plank Pose

A powerful arm and wrist strengthener, Side Plank takes its two-armed sibling to the next level, as an arm balance.

The full version of Vasisthasana, as taught by BKS Iyengar, with the top leg raised perpendicular to the floor, is beyond the capacity of most beginners. The pose described here is a modified version suitable for all levels of students.

(vah-sish-TAHS-anna

Vasistha = literally means "most excellent, best, richest." Vasistha is the name of several well-known sages in the yoga tradition. There's a Vasistha numbered among the seven (sometimes 10 or 12) seers (rishis) or lords of creation (prajapatis), and a Vasistha who's author of a number of Vedic hymns. He's also said to be the owner of the fabulous "cow of plenty," Nandini ("delight"), which grants his every wish and accounts for his infinite wealth.

Side Plank Pose: Step-by-Step Instructions

Step 1

Perform Adho Mukha Svanasana. Shift onto the outside edge of your left foot, and stack your right foot on top of the left. Now swing your right hand onto your right hip, turn your torso to the right as you do, and support the weight of your body on the outer left foot and left hand.

Step 2

Make sure that the supporting hand isn't directly below its shoulder; position the hand slightly in front of its shoulder, so the supporting arm is angled a bit relative to the floor. Straighten the arm by firming the triceps muscle, and press the base of the index finger firmly against the floor.

Step 3

Firm the scapulas and sacrum against the back torso. Strengthen the thighs, and press through the heels toward the floor. Align your entire body into one long diagonal line from the heels to the crown.

Step 4

If you'd like you can stretch the top arm toward the ceiling, parallel to the line of the shoulders. Keep the head in a neutral position, or turn it to gaze up at the top hand.

Step 5

Stay in this position for 15 to 30 seconds. Come back to Adho Mukha Svanasana, take a few breaths, and repeat to the right side for the same length of time. Then return to Adho Mukha Svanasana for a few more breaths, and finally release into Balasana.

Contraindications and Cautions

Students with serious wrist, elbow, or shoulder injuries should avoid this pose.

Beginner's Tip

Beginners often have a difficult time sustaining this pose, even with the soles pressed to a wall. Perform Adho Mukha Svanasana with your heels up on a wall. Measure the distance between your right foot and right hand, then step the foot halfway to the hand. Keep the right foot on the floor for support and turn the toes out to the right. Then shift onto the outside of the left foot, press the sole against the wall, and turn onto the left hand as described above. In this position the bent leg will provide some extra support. Step back to Adho Mukha Svanasana at the end of your stay, then repeat to the other side.

Benefits

  • Strengthens the arms, belly, and legs
  • Stretches and strengthens the wrists
  • Stretches the backs of the legs (in the full version described below)
  • Improves sense of balance

Camel Pose


Camel Pose

Bump up your energy by bending back into Camel Pose.

How to Say Ustrasana Sanskrit

(oosh-TRAHS-anna)
ustra = camel

Camel Pose Step-by-Step Instructions

  1. Begin kneeling with the thighs perpendicular to the floor, and the knees and feet hips distance apart
  2. Extend the big toes straight back, pressing down with all 10 toenails and firming the outer ankles into the midline
  3. Spin the inner thighs back and gently release the flesh of the buttocks towards the backs of the knees
  4. The pelvis is neutral, neither spilling forward nor spilling back, and stacks directly over the knees
  5. Root down from the tops of the feet to the knees; rebound up with the chest
  6. Bring the palms together in front of the sternum and drop the chin towards the sternum
  7. Take an inhale to emphasize the lift of the chest, then create Savasana arms (palms facing forward) and with the next exhale
  8. Keeping the chin dropping and the pelvis over the knees, take the hands to the heels 
  9. Immediately press the shoulder blades forward and up and coil the thoracic spine to lift the chest any amount more
  10. Having created more space/extension in the upper back, head can now drop back and hang free
  11. Continue pressing down with the feet and lower legs in order to lift up with the thoracic spine and chest
  12. Hold for 5-10 breaths, then, leading with the sternum, use an inhale to come up (head is the last part of the body to exit

Contraindications and Cautions of Camel Pose

  • Avoid or modify if you feel any pinching or pain in your low back
  • Avoid or modify if you have any shoulder pain, shoulder arthritis, or shoulder injuries
  • Avoid or modify if you have any back pain or injuries, including surgeries.
  • For most, it is best not to drop your head back in this pose, particularly if you have a neck injury or are at risk for stroke. Instead, lift your chin slightly and use your neck muscles to stabilize your head in place.
  • Avoid or modify if you have shoulder injuries or pain in the pose

Benefits of Camel Pose

  • Can boost energy and fight fatigue
  • Can help build confidence and empowerment
  • Improves posture and counteracts the effects of sitting and computer work
  • May help relieve back pain
  • Can counteract slouching and kyphosis of the spine
  • Stretches your abdomen, chest, shoulders, front of your hips (hip flexors), and front of your thighs (quadriceps)
  • Strengthens your back muscles, back of your thighs, and buttocks (gluteals)

Crane (Crow) Pose


Crane (Crow) Pose

A compact arm balance, Bakasana tones and strengthens the abs and arms.
(bahk-AHS-anna)
baka = crane

Crane (Crow Pose) Step-by-Step Instructions

  1. Begin in a squat with the feet together and the knees wide apart
  2. Tilt the torso forward so that the shoulders fit between the knees
  3. Grip the outer shoulders with the knees and place the palms together in front of the sternum
  4. Extend the sternum away from the navel while descending the tailbone towards the floor
  5. Place the hands on the floor shoulder distance apart and 6-8 inches ahead of the feet
  6. Come high on the toes and shift forward until the elbows stack over the wrists
  7. Continuing to reach the chest forward, lift the heels towards the buttocks
  8. Roll the heads of the upper arms back and up away from the floor
  9. Knees can either grip the outer shoulders or balance on the triceps
  10. Press the arms as straight as possible while bringing the feet and buttocks towards each other
  11. Hold for 5-10 breaths and then either release the feet to the floor or exit into Chaturanga

Cautions and Contraindications of crow pose

  • Avoid or modify if you have wrist arthritis, wrist pain, or carpal tunnel
  • Avoid or modify if you have any back pain or injuries, including surgeries, osteoporosis, disc bulging or herniation, arthritis
  • Avoid if you have a hip replacement or hip pain in the pose
  • Caution for shoulder pain or injury
  • Caution or avoid if you are pregnant, particularly in the 2nd and 3rd trimester
  • Modifications and Props

Benefits of crow pose

  • Improves focus
  • Stretches your buttocks (gluteals), front of thighs (quadriceps), and the palm side of your wrist (wrist flexors), which counteracts the effects of typing
  • Strengthens your core, upper back, chest, front of your hips (hip flexors), back of thighs (hamstrings), arms, shoulders, forearms, and back of wrists (wrist extensors)

Standing Head to Knee Pose


Standing Head to Knee Pose

Dandayamana Janushirasana Step by Step

Step 1: start from a standing position with your feet close to each other. Interlock all your fingers to create a platform where you will place your foot.

Step 2: Shift the weight of your body to the left leg and raise your right leg up by bending the knees. Lift up the leg to your highest level and lower your body so that it is easy to set the foot on the interlocked fingers.

Step 3: With your fingers below your foot and your torso bent forward, albeit slightly straighten the leg out so that it is parallel to the floor. If you do not get your leg to the parallel position do not force yourself to avoid injuries. Just go up to the level where you feel comfortable. Hold your foot at that position for a few breaths.

Step 4: Bend your arms and lower your elbows towards your calf, lower your entire upper body. Tuck your chin to your chest and round down so that your head is coming to your knee. The ideal position is where your head touches your knee but again this might be hard for many to achieve. Just lower your body to the level where you are comfortable.

Step 5: Hold the position for a few breaths and then alternate the legs. Ensure that you can feel a stretch on your lower back.

Benefits

  • Stretches the entire back

  • Strengthens the lower back

  • Stretches the hamstrings

  • Stretches the thighs

  • Stretches the arms

  • Strengthens the arms

  • Stretches and strengthens the shoulders
  • Strengthens entire leg, hip, and knee
  • Building determination 

Beginner Tips

  • Keep your abdominal muscles engaged during the pose by tucking them inside.

  • Avoid jerking your leg when doing the pose. The movements should be slow and controlled to avoid injuries.

  • Your body weight should be evenly distributed on the foot you are standing on.

Seated Forward Bend


Seated Forward Bend

Fold into Paschimottanasana to help a distracted mind—and your hamstrings—unwind.
(POSH-ee-moh-tan-AHS-anna)
paschimottana = intense stretch of the west (pashima = west
uttana = intense stretch)

Seated Forward Bend: Step-by-Step Instructions

Step 1

Sit on the floor with your buttocks supported on a folded blanket and your legs straight in front of you. Press actively through your heels. Rock slightly onto your left buttock, and pull your right sitting bone away from the heel with your right hand. Repeat on the other side. Turn the top thighs in slightly and press them down into the floor. Press through your palms or finger tips on the floor beside your hips and lift the top of the sternum toward the ceiling as the top thighs descend.

Step 2

Draw the inner groins deep into the pelvis. Inhale, and keeping the front torso long, lean forward from the hip joints, not the waist. Lengthen the tailbone away from the back of your pelvis. If possible take the sides of the feet with your hands, thumbs on the soles, elbows fully extended; if this isn't possible, loop a strap around the foot soles, and hold the strap firmly. Be sure your elbows are straight, not bent.

Step 3

When you are ready to go further, don't forcefully pull yourself into the forward bend, whether your hands are on the feet or holding the strap. Always lengthen the front torso into the pose, keeping your head raised. If you are holding the feet, bend the elbows out to the sides and lift them away from the floor; if holding the strap, lighten your grip and walk the hands forward, keeping the arms long. The lower belly should touch the thighs first, then the upper belly, then the ribs, and the head last.

Step 4

With each inhalation, lift and lengthen the front torso just slightly; with each exhalation release a little more fully into the forward bend. In this way the torso oscillates and lengthens almost imperceptibly with the breath. Eventually you may be able to stretch the arms out beyond the feet on the floor.

Step 5

Stay in the pose anywhere from 1 to 3 minutes. To come up, first lift the torso away from the thighs and straighten the elbows again if they are bent. Then inhale and lift the torso up by pulling the tailbone down and into the pelvis.

Contraindications and Cautions

  • Asthma
  • Diarrhea
  • Back injury: Only perform this pose under the supervision of an experienced teacher.

Beginner's Tip

Never force yourself into a forward bend, especially when sitting on the floor. Coming forward, as soon as you feel the space between your pubis and navel shortening, stop, lift up slightly, and lengthen again. Often, because of tightness in the backs of the legs, a beginner's forward bend doesn't go very far forward and might look more like sitting up straight.

Benefits

  • Calms the brain and helps relieve stress and mild depression
  • Stretches the spine, shoulders, hamstrings
  • Stimulates the liver, kidneys, ovaries, and uterus
  • Improves digestion
  • Helps relieve the symptoms of menopause and menstrual discomfort
  • Soothes headache and anxiety and reduces fatigue
  • Therapeutic for high blood pressure, infertility, insomnia, and sinusitis
  • Traditional texts say that Paschimottanasana increases appetite, reduces obesity, and cures diseases.

One-Legged Down Dog


One-Legged Down Dog

How To Do Eka pada pranam asana(One Legged Prayer Pose)

  1. Stand on the floor or yoga mat with hands on the side in Tadasana .
  2. Focus the gaze on one point at eye level and breath normally.
  3. Now slowly bend your right knee and place the sole of the foot to the root of the left thigh .
  4. Now place your hands in front of the chest in pranam asana.
  5. Hold the asana for a short duration maintaining balance.
  6. Now release the right leg and lower it on the floor .
  7. The practice can be repeated with the other leg also.


Breathing : — Inhale while standing on one foot in the starting position keeping your head high gazing at a point . Breathe normally in the final
Position and exhale while coming back to the starting position .

Precautions — Eka Pada Pranamasana

  • Yoga Asana should be practiced either early in the morning or at least after 3–4 hours of the meal .
  • Please do not practice one legged prayer pose if you have injury in your ankle, leg or foot.
  • During the pregnancy this asana is not recommended.
  • People suffering high blood pressure, hernia ,vertigo, slipped disc should not attempt this practice.


Benefits:

  • Quiets the mind
  • Strengthens the arms
  • Stretches the hamstrings and hip flexors
  • Develops confidence in balance

Contraindications:

  • Carpal tunnel syndrome
  • High blood pressure

Privacy Policy for ccc app

  Privacy Policy Ranjit Dagar built the CCC Preparation Book in hindi app as a Free app. This SERVICE is provided by Ranjit Dagar at no cost...